
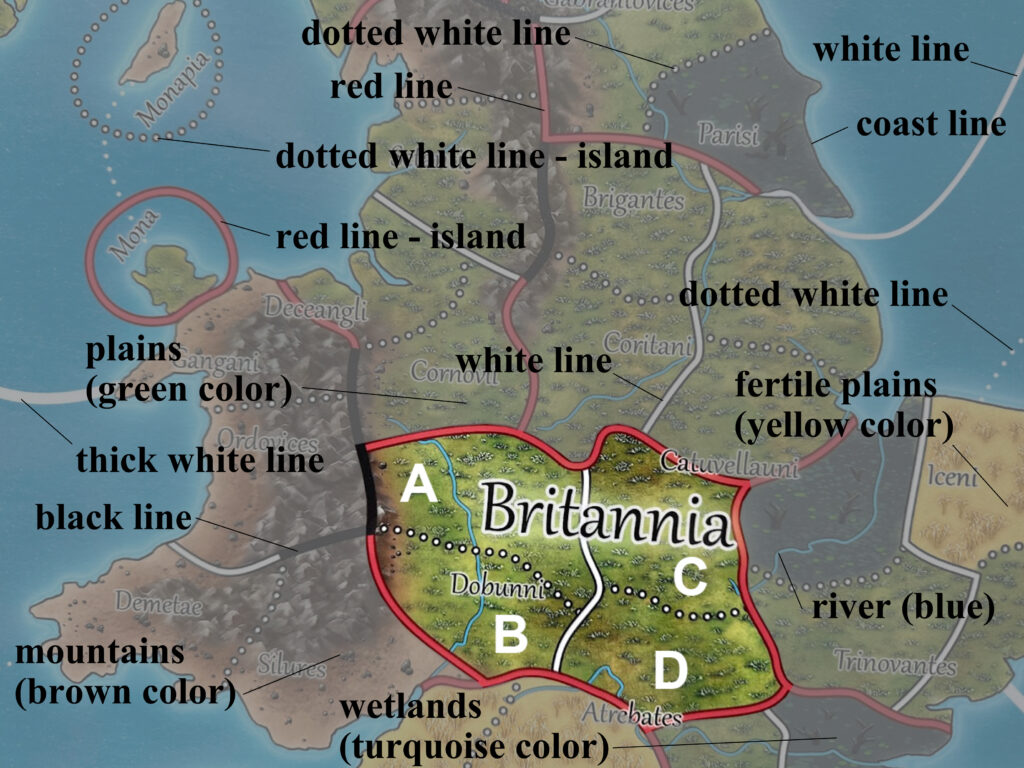
Map:
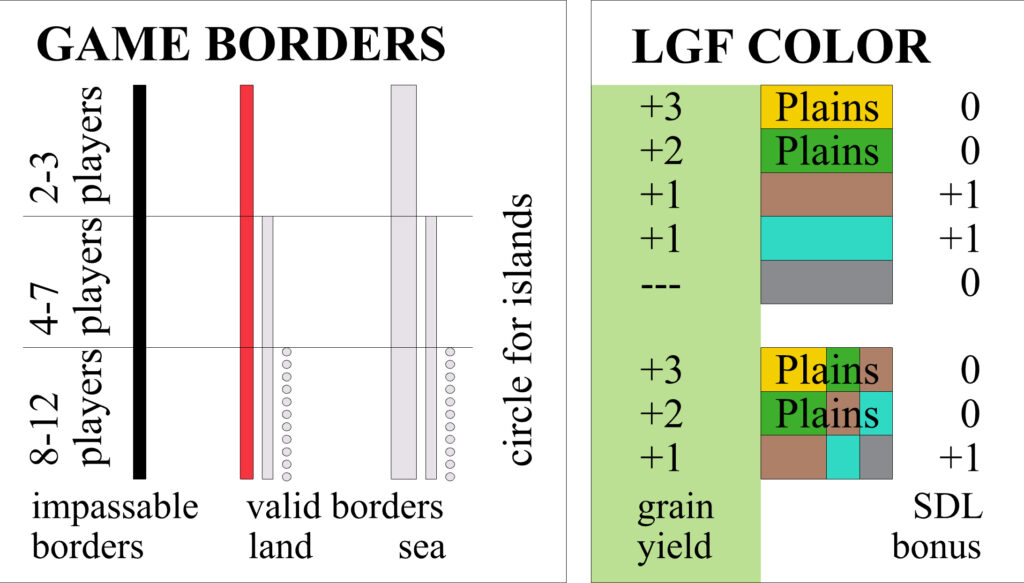
The map gets larger inwards as the number of players increases (there are more lines defining the boundaries between the Game Fields). Each Game Field also has a quality that determines the fertility, defensibility of settlements, but also affects the stats of the units fighting (for example, Heavy Infantry doesn’t fight as effectively in the mountains).
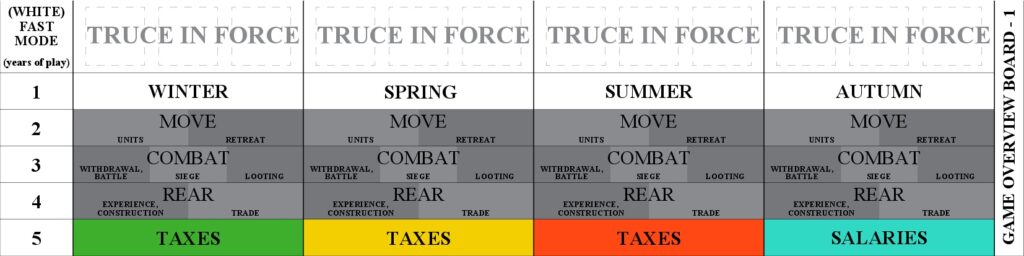
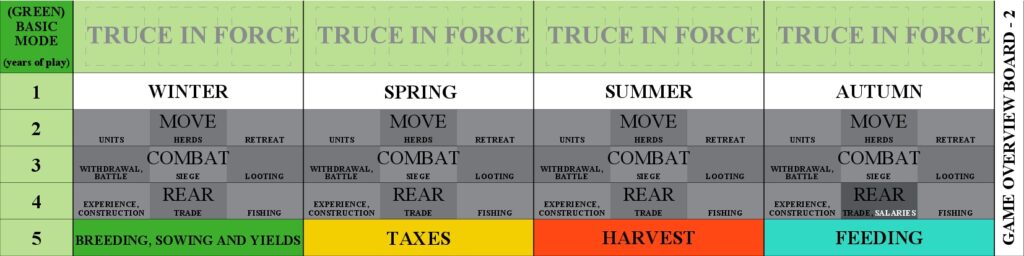
4 game modes – Overview Boards:

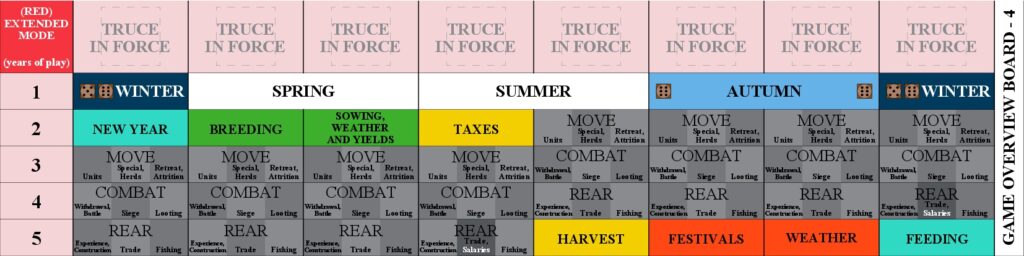
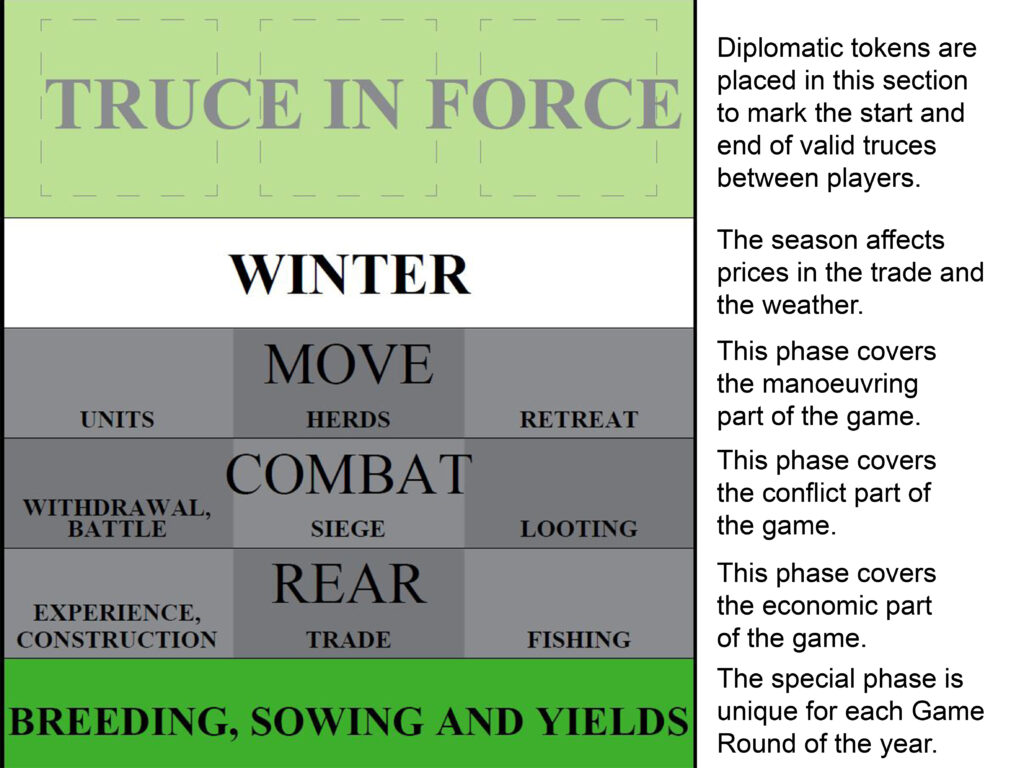
Game Mechanics – Regular Phases:
Move Phase:
The Move phase is divided into several subphases, always played separately.The first one is MOVE-Units. Simply put, each unit has a movement capacity of 1 (move one Game Field). If it combines its movement with a Transport Ship, it can achieve a movement of up to 2 Game Fields. All players play simultaneously and the moment a unit moves, it turns its pointer from 12 o’clock to 3 o’clock. This makes it exhausted for that phase. The moment all players have exhausted their movement capacity, or do not wish to exhaust it, the game moves to the next subphase.
This is followed by the Move-Special subphase, which has only been used since Yellow Mode. Those interested can find its description in the rules.This is followed by the Move-Herds subphase, in which it is possible to move herds or grain within connected Game Fields. The only condition is that the starting field must not be locked (i.e. the presence of a foreign unit).
The MOVE-Retreat subphase follows. Only two moves are allowed here, provided that the initial Game Field is not locked. This is a move to a Game Field with its own completed Settlement and a move to a Transport Ship (this Field must also not be locked). This is actually a bonus defensive move. The unit will rotate the pointer to 9 o’clock after the movement is executed.
If during the Move phase a unit was exposed to danger (for example, passing through the desert), it rolls its Attrition dice. (MOVE-Attrition)Example of simultaneous play:
More on this, including examples of ship movement combinations, in Saturday’s article. If you’re wondering what happens when units cross movement, or what implications this system may have, you can take a look at the game rules now.
Combat Phase:
The Combat Phase is divided into several subphases, always played separately.If multiple Units meet on a Game Field (or border), that Field is locked for the rest of the Move Phase. This is then resolved in the Combat phase. The first subphase is called COMBAT-Withdrawal and is simple: if there is an uncircled settlement on the Game Field, it can be withdrawn to before the actual battle. However, this will create a encirclement.
Followed by COMBAT-Battle. It can be a battle in the field, a naval battle or a battle on the border. First the terrain of the Game Field is determined, then dice are assigned to units, then bonuses are assigned, and finally dice are rolled. The combinations that can occur are countless.
Experience from this battle – REAR-Experience:
After each round of battle you can escape or fight to the end. Escape can be to a Settlement on the Field (indicated by placing a Unit under the Settlement), or to an adjacent Game Field. But only controlled by the player. It is also possible to escape to a neutral one, but there the player can be followed (no escape from there).
The siege is probably the most difficult part of the battle. But it’s not necessary to attack right away. Sometimes it’s better to wait for a unit to upgrade to a siege engine, reinforcements, or for the defenders to run out of food. More about COMBAT-Siege in the rules or in the next article.
The final subphase is called COMBAT-Looting, and it is possible to loot the Game Field (placing a red token) to devalue it or to loot captured settlements. From both, the player gets gold. But more interesting are the situations where a settlement surrenders or is not defended and thus is not destroyed but seized. Or situations where a conquered city can be spared looting (without gaining gold) and instead of destroying it, the player can gain his own village. Again, see the rules for details.
Rear Phase:
The Rear Phase is divided into several subphases, always played separately.The first thing to do is to allocate experience to the units gained during this game round from Training or Combat (REAR-Experience).The construction work for this Game Round is then performed (check the number of units present and rotate the number of quarters accordingly) in REAR-Construction.
In the REAR-Trade subphase you can trade commodities, buy units, building materials for buildings, pay for unit upgrades, unit training or pay ransom or military aid.
If the REAR-Salaries subphase occured, mercenaries must be paid.In the last subphase, REAR-Fishing, fishing can be done on the Sea Game Fields that the player controls.
Special Phases:
Depending on the mode played, there are different Special Phases in the year. We will show you the ones for green mode:Once winter is over, the Breeding phase begins, when the herds breed. For every two of the same herds, the player gets one more herd. For the odd one, a dice is rolled.
At the same time, the Sowing of grain from the stocks stored in the settlements is also taking place. It is not possible to sow on the Game Fields where the herds are located. So each player places one grain on an empty Game Field that he controls and has a connection to the Granary. The Yield is then determined by the color of the Game Field (or the weather). From the component stockpile, grain tokens are placed on top of those already sown.
In the middle of the year, the player collects Taxes. This is income in gold from controlled Game Fields, settlements and the port (trade duties). Again, a connection to a settlement is required. In addition, taxes cannot be collected from looted Game Fields, encircled settlements or blockaded ports.
At the end of the summer, the grain Harvest from the controlled Game Fields will finally take place. Connectivity and spare capacity in the settlements is needed. Occasionally, Game Fields will change hands between sowing and harvesting.
However, the most important special phase is Feeding. First it must be decided which herds will be fed and which will be slaughtered. The meat obtained, together with grain and fish, is used to feed the units and settlements. Connection is required. A cleverly encircled settlement with no supplies can surrender to the attacker without a fight if fed. Too large an army can easily deplete a farm. You’ll need some grain next year for sowing, and the more herds you slaughter, the less they will breed. But for big farming you need a lot of Game Fields. It’s probably obvious that you’ll have a lot of fun anyway, thanks to hostile neighbours.